25 December 2007
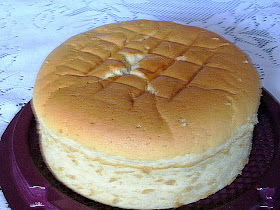
I finally succeed in getting a nice and tall chiffon cake again. This time I make sure I don't underbeat the egg whites and beat until stiff and dry stage. I guess it works! I like the nice green tea fragrance. We usually don't find bakeries selling green tea chiffon cakes right? I wish I have added some Japanese Azuki Beans. :)
Recipe for Green Tea Chiffon Cake (6 inch)
(Modified from here)
Ingredients
(A)
2 egg yolks
20g castor sugar
(B)
25ml warm corn oil
35ml warm water + 1 tsp green tea powder
(C)
50g cake flour
1/2 tsp baking powder
(D)
3 egg whites
1/4 tsp cream of tartar
20g castor sugar
Method
1. Cream ingredients (A) with hand whisk till sugar dissolved.
2. Add in ingredients (B) in the respective order and mix well before adding the next item.
3. Sieve in ingredients (C) and mix till no lumps.
4. Beat egg whites with electric beater till frothy, sprinkle in the cream of tartar. Beat till white in colour and add in sugar by thirds. Egg white should be beaten till stiff peaks are formed.
5. Put half portion of egg white into yolk mixture and mix it with a hand whisk in 6 strokes.
6. Pour yolk mixture into the rest of the egg white and mix well with hand whisk.
7. Put batter into a chiffon cake pan, bang the pan on a hard surface several times to release the bubbles and bake at 170C for 25 minutes or till cooked.
8. Invert cake on a wire rack immediately to cool completely.
Pages
▼
Friday, December 28, 2007
Wednesday, December 26, 2007
Chocolate Chip Cookies and Bread Pudding
20 December 2007
Quite sometime ago, I found this website called Blogger's Recipe that has a collection of recipes. Most of them are cooking recipes, and since I'm not a good cook, I don't think I will be trying them out. But on this day, seeing that there were quite a lot of bread left, I tried this healthy bread pudding.
And while waiting for my bread pudding to be done, I started preparing my chocolate chip cookies. There seems to be a lot of different recipes for chocolate chip cookies. I found the most basic one and from here you can adjust the quantities to your own liking.
Recipe for Chocolate Chip Cookies (makes 12)
Ingredients
115g butter, softened
115g caster sugar ( I use half caster sugar, half brown sugar)
1 egg, lightly beaten
1 tsp vanilla essence
175g plain flour
1/2 tsp bicarbonate of soda
1/8 tsp salt
175g chocolate chips
Method
1. Cream the butter and sugar until pale and fluffy.
2. Beat in the egg and vanilla essence.
3. Sift the flour, bicarbonate of soda, salt and fold in with the chocolate chips.
4. Drop tablespoonfuls of the mixture on to the prepared baking sheet. Use another spoon to push it onto the tray, if required). Leave plenty of space between the cookies to allow for spreading during baking. Flatten each cookie slightly with the back of the fork.
5. Bake the cookies at 180C for about 10-15 minutes until golden. Transfer to a wire rack to cool.
More tips
1. For chocolate flavour, substitute 1 tbsp cocoa powder for the same quanity of flour.
2. For a chunkier texture, use coarsely chopped chocolate instead of chocolate chips.
3. For mocha flavour, use coffee essence instead of vanilla essence.
4. For nutty flavour, add whole or chopped macadamia nut, walnut or hazelnut.
5. For fruity flavour, add chopped dried fruit, such as raisins, sultanas, etc.
Monday, December 24, 2007
Friday, December 21, 2007
Sweet Buns
16 December 2007
Have been quite long since I started baking and all that I have baked are cakes, muffins and cookies. I feel like baking something new and after seeing sweet tooth's first attempt to bake buns, I decided to try it myself.
I also followed Happy Homebaker's Sweet Buns recipe. I took a really long time to knead but still had not been able to knead until it can be stretched into a thin layer without tearing. Then I gave up and left to to proof. Due to the rainy and cold weather these few days, I left it to proof for nearly 2 hours. I also had problems shaping the buns well and they all turned out looking out of shape. :)
The bread is soft but not very soft and fluffy. Probably because I did not knead well. It turned hard on the next day. I wonder how the bread we buy from the bakery remains soft for a few days.
If you have noticed that I have not been updating my blog, it's because my pc crashed due to virus and removed everything in my pc. Now I have to reinstall everything again. :(
Sunday, December 09, 2007
Nutella Muffins
9 December 2007
Nutella has always been my favourite since I was young. It's my favourite spread on my bread for breakfast. So I decided to try this Nutella muffins from Precious moments. The swirls I did are not very obvious. Overall the taste is not too bad. The nutella taste is not very strong though. Perhaps because it is only spread on the top. I prefer something very nutella. :)
This is a lemon chiffon cake that I have tried last week. It's the second time my chiffon cake sink again. I guess it has to do with beating the egg whites. Shall try again next time.
Tuesday, December 04, 2007
The Little Garden
This is the little garden along our corridor. They are all managed by my mother who is quite a gardening enthusiast. I know nothing much about gardening and can't recognize most of her plants actually. Here are some of the plants we have. Sorry if I don't know the names of some of the plants. :P
Long beans:
Peppermint:
Lady's Finger (no lady's fingers yet):
Pandan leaves:
Sweet potato leaf:
Chillies:
A type of herb. I check with my mother. It's called 红田乌 in Chinese (Hong Tian Wu). It's good for diabetes and high blood pressure. Just boil it with water and drink.
A type of herb called 马尾草, also good for diabetes and high blood pressure.
Pomegranate (石榴):
Aloe vera:
Orchid:
Other flowers:
Thursday, November 29, 2007
Chocolate Chips Rock Buns
28 November 2007
I made my first rock buns during the Home economics class when I was in lower secondary. I remembered we were taught to make rock buns to demonstrate the rub-in method. We also had to make rock buns as a class test too. However, I hardly remember its taste now and I have thrown away the recipe of course. I have tried to search the recipe in the new home economics books but I can't find it. So I search the internet for a few recipes and modify here and there and this is how I make it.
Recipe for Rock Buns (makes 14)
Ingredients
200g plain flour
1 tsp baking powder
Pinch of salt
100g butter, softened
100g soft brown sugar (I reduce to 75g)
Handful of chocolate chips (you can add sultanas/raisins instead)
1 small egg
1-2 tbsp milk
Method
1. Sift flour, baking powder and salt together into a mixing bowl. Rub in the butter lightly with the fingers until the mix resembles fine breadcrumbs. Stir in the sugar and chocolate chips.
2. Whisk the egg and 1 tablespoon milk together. Make a well in the centre of the flour mixture and pour the egg/milk mixture in. Stir until the dough comes together into a ball.
3. Line baking tray with greaseproof paper. Scoop a tablespoon of the dough and push it onto the tray with another spoon.
4. Bake at 190C for 15 minutes until the top is light golden brown. Leave to cool.
More tips:
1. Use brown sugar instead of white sugar for a better taste.
2. Use moist dried fruit like sultanas or raisins if you prefer a more fruity rock bun.
3. If the mixture is too dry to make into a ball because the eggs were smaller than needed, moisten the mix with a little more milk.
4. They will dry out if they bake for too long and become very hard. So do not overbake them.
These rock buns are quite hard and crunchy and my house is filled with nice buttery fragrance. And they are easy to make too without a lot of washing up after baking.
Don't know how to classify it so I will place this under cookies since they taste more like cookies to me.
Friday, November 23, 2007
Orange Almond Cupcakes
22 November 2007
This recipe is taken from one of Alex Goh's book. The original recipe fills the mixture into greased cupcake moulds and it looks like that.
And this is how my cake looks like.
Erm... very far from the book right? I don't know why my cupcakes and muffins always rise until like a volcano that is going to explode and the top will always crack. Look at how flat and nice top the original one has.
I tried 2 versions of this recipe. After mixing A and B and adding orange juice and zest, I divided the batter into 2 portions. One half I added the butter as in the recipe, the other half I added vegetable oil. I just want to know if it will affect the taste as I thought it will be healthier to replace butter with vegetable oil. Result is quite obvious lah. The one with the butter definitely taste better, but I think the oil version just lose out by 0.5 points. Both are great!
Recipe for Orange Almond Cupcakes (I make 10 small ones with half the recipe)
Ingredients
(A)
4 eggs
2 eggs yolks
175g sugar
(B)
190g plain flour
50g ground almonds
1½ tsp baking powder
(C)
40g orange juice
1 orange zest, grated
200g butter, melted
(Garnish)
Flaked almonds
Method
1. Whip (A) until sugar dissolves and it turns thick. (Note: overwhipping (A) will cause the cake to collapse).
2. Fold in (B) and mix until well blended.
3. Stir in (C) and mix until well incorporated.
4. Spoon it into cupcake cases and sprinkle some flaked almonds on top.
5. Bake at 190C for 20 minutes. Remove and cool.
Monday, November 19, 2007
Mocha Light Cheesecake
18 November 2007
Bake this Mocha Light Cheesecake on an early Sunday morning. I got this recipe from a Chinese Cheesecake book, can't remember the title. This is quite similar to the Japanese Cheesecake that I had made before. The top of the cake crack quite badly this time. Hm... any idea why? Is it because the temperature is too high or too little water in the water bath? I notice that it is almost dry up when I finish baking. Another story about egg whites. Again! It's easier to beat the egg whites this time after I clean the mixer thoroughly. So it must be because of the grease.
This Mocha Light Cheesecake is for 2 of my best friends. This is the first time they try my bake. I hope it's up to standard. 3 of us finish the whole cake. So I guess should be not too bad lah. :)
Recipe for Mocha Light Cheesecake (7 inch round)
Ingredients
Ingredients A:
70g softened cream cheese
20g softened butter
25g fresh milk
Ingredients B:
2 egg yolks
50g cake flour
1 tsp instant coffee powder
½ tsp coffee paste (I don't have this)
Ingredients C:
3 egg whites
50g caster sugar
½ tsp cream of tartar
Method
1. Double-boil A until melted. Remove from heat, add egg yolks one at a time and mix well. Add in cake flour, instant coffee, coffee paste and mix well.
2. Put C into a clean mixing bowl and beat until white and stiff.
3. Mix 1/3 of egg white mixture with cream cheese mixture until well combined. Add in the remaining egg white mixture and mix well.
4. Wrap bottom of a 7 inch/17.5cm ring pan with greaseproof paper and place onto a baking tray filled with water to prevent cake from drying out.
5. Pour batter onto the pan and bake at 170C for 25 minutes.
6. Remove cake from ring pan immediately and leave to cool on rack.
Sunday, November 18, 2007
Cornflakes Muffins
17 November 2007
It was a gloomy afternoon and I decided to bake some cornflakes muffins from Baking Fiend. I specially bought a box of cornflakes to make this and perhaps to try bake to some cornflake cookies in the near future. Another simple recipe that requires just mixing the wet and dry ingredients. Very creative to use cornflakes to make muffins right? :)
And I finally found the other set of star shape cookie cutters at Daiso and quickly grab a set. :)
Wednesday, November 14, 2007
Orange Chiffon Cake
13 November 2007
I'm so disappointed when I turn the cake out of the tube pan. It is far too bad from the precious 2 chiffon cakes that I had made. I think it's probably due to the egg whites. It took unusually long to beat the egg whites to stiff peak. I did not reach the stiff peak stage eventually and I decided to fold into the egg yolk mixture. And that was how the result came out. I suspect that maybe the bowl was not cleaned properly the last time. I couldn't think of other reasons yet.
Other than the shape of the cake, I still like this cake very much as it's very soft and orangy.
Recipe from "Chiffon Cake is Done" by Kevin Chai
Ingredients (I reduce portion to using 2 eggs for 6 inch tin)
7 egg yolks (I use 2)
50g caster sugar (I use 15g)
1/4 tsp salt (I omit)
4 tbsp cooking oil (I use 20ml)
2 tbsp grated orange rind (I grate 1 orange)
60ml orange juice (I use 20ml)
few drops orange colouring (I omit)
110g self raising flour (I use 35g)
7 egg whites (I use 2)
1/2 tsp cream of tartar (I use 1/4 tsp)
130g caster sugar (I use 40g)
Method
1. Combine egg yolks, salt, sugar and beat until pale in colour. Add cooking oil, grated orange rind, orange juice and colouring and mix well.
2. Fold in flour until batter forms.
3. Whisk egg whites and cream of tartar until frothy. Add in sugar gradually in 3 portions until stiff peaks form.
4. Gently fold in egg white mixture into the egg yolk mixture, 1/3 at a time.
5. Pour mixture into ungreased 9 inch tube pan and bake at 170C for 30-40 mins.
6. Remove from oven and quickly turn the chiffon cake upside down on a wire rack.
7. Wait for the cake to cool completely before removing it from the tin.
Monday, November 05, 2007
Almond & Green Tea Tuiles
4 November 2007
I don't know how to pronounce this. I think "tuiles" sounds like "twills". Tuile is French for tile. It's a thin and crispy French cookie that got its name because it copies the shape of roofing tiles once used in France.
I got the recipe from Do What I Like. It's almost similar to the almond crisps that I had tried (unsuccessfully) before. The only difference is adding some melted butter for this tuile recipe. I left out the green tea powder initially as I wanted to make 2 different flavours. Then halfway during baking, I added some green tea powder to the remaining batter to make green tea tuiles. After the bad experience from the last time I baked the almond crisps, I use Glad baking paper this time and the cookies really do not stick to the baking paper, even without greasing.
The tuile is done by spreading a thin circle of batter on the baking paper using the back of the spoon. When baking is done, you have to remove it from the tray quickly and place it over a rolling pin and press gently to make the curved shape.
Here are some of the things that happened during baking:
1. It is important to spread the batter very thinly, about the thickness of the almond. Or else the tuiles will not be crispy enough. Make sure to spread evenly too. Some of the first few tuiles that I made, break when I try to curve them on the rolling pin cos I did not spread evenly.
2. Bake 4 tuiles at a time. Cos you need to place them on the rolling pin quickly. They will become too crispy to roll when they cool down.
3. I'm not sure if my oven temperature is too high. I set at 170C but it browned quite fast and I took about 5 minutes only instead of 7-8 minutes.
The tuiles don't stay crispy for very long. It's best eaten immediately after baking. And remind you, it's so nice that you can easily finish everything at one go. I quite like the green tea flavour. Very refreshing taste. Hm... maybe can try adding cocoa powder the next time to make chocolate tuiles. :)
Wednesday, October 31, 2007
Vegan Chocolate Cake
1 November 2007
I tried this Vegan chocolate cake yesterday as I'm very curious about how a cake that does not contain any butter, egg and milk would taste like. It's not a very beautiful cake. I'm not sure if I bake enough or not. The cake is quite dense and moist. The taste I would say is ok. Can't compare it with other chocolate cakes. But it's definitely a healthier cake and probably would taste much better with frosting.
Ingredients (8 inch round)
300g self raising wholemeal flour (I use self raising flour)
50g cocoa powder
3 tsp baking powder
250g caster sugar
few drops vanilla essence
9 tbsp sunflower oil
350ml water
Method
1. Preheat the oven to 170C.
2. Sift the flour, cocoa powder and baking powder into a mixing bowl. Add the caster sugar and vanilla essence, then gradually beat in the sunflower oil and water to make a smooth batter.
3. Pour the cake mixture into a lined and greased tin and smooth the surface with the back of a spoon.
4. Bake at 170C for about 45 minutes or until a skewer inserted into the centre of the cake comes out clean. Leave in the tin for about 5 minutes, then turn out and cool on a wire rack.
Bake another Marble chocolate cake today for my mother's friend.
I have also bought a bottle of bakeable green tea powder. Will try out some green tea cake soon.
Sunday, October 21, 2007
Apple Pie
21 October 2007
Something must be wrong with my brains today. I miscalculate the amount of flour and almost create a disaster for the apple pie.
The recipe uses 125g of low-protein flour and 125g of high-protein flour. I carelessly convert it as 125g plain flour only. Should be 250g plain flour right? What a silly mistake! And I only realize it after finished baking the apples pies!
I was wondering why the dough is so watery. In the end, I just continue adding more flour until the dough is no longer sticky. And that's how I manage to save my dough. I hope it doesn't affect the taste of the apple pies. Luckily, it is actually better than what I expect.
These apple pies don't look like apple pies right? Usually apple pies are baked in pie pans. But since I do not have one, I cut out 2 sheets of dough using a round cutter, place a piece on the tray first, put in the apple fillings, then lay another piece on top and press to close the edges. Kind of ugly right, but it's ok. :)
Photos taken with my handphone as I don't have the camera with me today.
Ingredients
Pastry:
250g plain flour
160g butter, cut into cubes
1 tsp salt
1/2 tbsp sugar
75ml iced water (I place water in the fridge for 30 minutes)
Filling:
(A)
110g apple, cut into small cubes
130ml water
10ml lemon juice (I did not add)
50g sugar (I reduce to 40g)
(B)
30ml water
1 tbsp cornflour
(C)
10g butter
2g cinnamon powder (I omit this)
1g nutmeg powder (I omit this)
Some egg, beaten for glazing
Method
Pastry:
1. Sift the plain flour in a mixing bowl. Rub in the butter until small crumbs are formed.
2. Mix salt, sugar and iced water until fully dissolved.
3. Add the water mixture in step 2 into the crumbs mixture in step 1. Fold and knead with hand until dough is well combined. Do not overmix until too smooth. Put in the fridge for 30 minutes.
Filling:
1. Boil ingredients (A) for 10 minutes.
2. Mix ingredients (B). Add (B) into (A) and cook until the mixture thickens.
3. Add in (C), mix well and cool.
4. Bring out the dough. Roll and press into a thin sheet. Use a round cutter to cut out 2 sheets of dough. Place a piece on the tray first, put the apple fillings in the centre, then lay another piece on top and press to close the edges. Brush the top with a layer of egg. Prick holes on the top with a fork. Continue until all ingredients are used up.
5. Bake in a pre-heated oven at 200C for about 20 minutes until nice golden brown.
Sunday, October 14, 2007
Banana Chiffon Cake
13 October 2007
It was only 2 days after I made my 1st chiffon cake. I can't wait to try another chiffon cake again. :) This time a Banana Chiffon Cake, recipe is also taken from "Chiffon Cake is Done" by Kevin Chai. Oh, I didn't buy that book, I "copy" the recipe when I'm browsing books at the bookstore. Hehe...
I must say I have started to like banana cakes. It is so soft and spongy that I think a 6 inch chiffon tin seems a bit too small for my family. Each of us only get to eat a small piece and seems like not enough for us to eat!
I think I did a better job this time. I'm more used to beating the egg whites. I will set to a low speed when beating the last batch of sugar so that I can control the consistency better. I check by tilting the mixing bowl, if the mixture does not flow and remain in shape, then it is probably around there. But the mixture must still remain smooth and glossy and not overbeaten. I think I still need more practice to be very sure. Another thing I discover is that I need to turn the cake upside down AS SOON AS it is removed from the oven. I remembered for the Milo chiffon cake, I was very slow and that's why the cake sank very fast. This time it is a bit better. But I think it will be good if I can do it faster. Lastly, I can't seem to remove cake properly. As you can see from the photo, parts of the cake on the sides still remain in the tin!
Ingredients (portion reduced to using 2 eggs for 6 inch tin)
2 egg yolks
1/8 tsp salt
20ml oil
60g banana puree (1 medium banana)
15g sugar
35g plain flour
1/8 tsp bicarbonate of soda
2 egg whites
1/4 tsp cream of tartar
30g sugar
Method
1. Combine egg yolks, salt, sugar and beat until pale in colour. Add oil and mix well. Add banana puree and mix well.
2. Fold in plain flour and bicarbonate of soda until batter forms.
3. Whisk egg whites and cream of tartar until frothy. Add in sugar gradually in 3 portions until stiff peaks form.
4. Gently fold in egg white mixture into the egg yolk mixture, 1/3 at a time.
5. Pour mixture into ungreased tin and bake at 170C for 25 mins.
6. Remove from oven and quickly turn the chiffon cake upside down on a wire rack.
7. Wait for the cake to cool completely before removing it from the tin.
Friday, October 12, 2007
1st chiffon cake
11 October 2007
Inspired by Happy Homebaker, I bought a 6 inch chiffon tin and eagerly tried to bake a Milo chiffon cake yesterday. It was exciting to see the chiffon cake rise inside the oven until quite high. At the same time I felt a bit uneasy, worrying that it would sink down. Then the expected result came. It sank within seconds after I removed it from the oven. As a result, the cake was in a funny shape when I cut a portion out.
Nevertheless, the taste is very good and it is soft and cottony, although the milo taste is not strong. I'm not very sure why the chiffon cake sank so fast. Not sure also whether I have beaten the egg whites to the right texture. Guess I have to try again. I think my family will like chiffon cake better because it is healthier. :)
Friday, October 05, 2007
Chocolate Torte
5 October 2007
I finally try baking this Chocolate Torte today, another recipe that has been in my recipes-to-try list for a long time. Mine did not crack and sink a lot. It is flaky on the top and soft and moist in the centre. I have never tasted a Chocolate Torte before. But this Chocolate Torte is surely one of the best. Thanks to Happy Homebaker. She's like my half-teacher in baking and I always visit her blog for new recipes and tips for baking. :)
Recipe from Happy Homebaker