27 January 2008
I'm back with more CNY cookies for the 2nd week. This week is the cashew nuts cookies. I used to help my mother bake these cookies many years ago. I can still remember the times we baked the cookies during the weekends before chinese new year. But ever since we shifted house, we stopped baking as we did not have oven anymore and she said she's old already and lazy to bake. Ha! Occasionally, during chinese new year, we would miss the cookies we made and buy from bakeries. But most of the time, they don't taste as good as those we used to make.
Finally, this year, I can bake on my own. My mother no longer has her old recipe with her. I have to search for a new recipe to try out. This recipe is taken from the same book as last week's one. I modify it a bit though. The good thing is I'm still using the old crescent-shaped cookie cutter. Luckily she did not throw it away. :)
I couldn't have asked for more. The recipe is great. It's quite close to our old recipe. Definitely have to keep this recipe properly this time so that I can make them every year.
Cashew Nuts Cookies
(Recipe modified from Easy Cookies (and with my mother's past experience))
Ingredients (I make 130-136 pieces)
110g butter
70g castor sugar
1 tsp pure vanilla extract
1/2 egg (about 25g)
40g grounded cashew nuts*
180g plain flour
20g cornflour
1/2 tsp baking powder
* Bake cashew nuts lightly at 150 deg C for around 10-15 minutes till fragrance is released before grinding
Topping:
1 egg, separated
136 halved cashew nuts
Method
1. Cream butter and sugar till pale and creamy.
2. Add in pure vanilla extract. Add in egg slowly, Beat until well-mixed.
3. Fold in grounded cashew nuts. Fold in sifted flours and baking powder gradually. Knead to form dough.
4. Roll the dough into 3/4 cm thickness. Cut the dough into crescent shapes (or any shape you like) and place them on the baking tray. Brush a layer of egg white on the cookies and top each cookie with one halved cashew nut. (Brushing egg white helps the cashew nut to stick to the cookie well.) Brush a layer of egg yolk on top of the cashew nuts for a nice golden brown colour.
5. Bake at 180C for about 15 minutes till light golden brown.
Pages
▼
Sunday, January 27, 2008
Sunday, January 20, 2008
CNY Cookies 1
20 January 2008
Yes, I'm a bit excited. Today I bake my first batch of CNY cookies - cornflake cookies. As it is only my first try, I use only half the recipe and I take the whole morning to do it.
I use a recipe taken from a book and I suspect that the recipe is not very accurate. The dough is very sticky and I am unable to roll them into little balls as the dough keep sticking to my hands. I have to add more flour, little at a time until it doesn't stick anymore. Then, just roll the little balls with more cornflakes, place them in little paper cups and bake.
I make 40 little cornflake cookies and put them nicely in a container just like those selling outside. I wonder if they taste good as compared to the commercial ones (actually I have not tried cornflakes cookies before, haha!). But I'm quite sure I will not buy any cornflakes cookies this year, cos nothing can beat home-made cookies. :)
Cornflake Cookies
(Original recipe from Easy Cookies)
Ingredients (makes 40 with half the recipe)
200g butter
200g castor sugar
1 tsp vanilla essence
2 eggs
240g plain flour (recommend to add more if the dough is too soft)
1 tsp baking powder
30g ground cornflakes
60g cornflakes, for coating
Method
1. Cream butter and sugar. Add in egg and essence, mix well.
2. Fold in sifted flour and baking powder gradually. Then add in ground cornflakes. Knead to form dough.
3. Roll small dough into round shape, then roll with cornflakes. Put into paper cups.
4. Bake at 180C for about 15 minutes.
Tuesday, January 15, 2008
A day for bananas
14 January 2008
Taking a little break from baking mainly because have been eating quite a lot of sweet stuffs and have to control a bit. Meanwhile, I have been thinking what to bake for the coming cny and I'm hoping to start by this week. :)
With some bananas left, I bake a banana sponge cake from Alex Goh's book which I'm lucky to borrow from the library without any missing pages. And an attempt to make chocolate banana muffins.
I modified a bit from the original recipe. Firstly, I bake in a 6 inch round tin instead of cupcake moulds. I also half the recipe and change butter to vegetable oil for a healthier version. Instead of following the recipe - beating sugar, eggs and flour altogether, I beat sugar and eggs till light and fluffy, then fold in the flour by hand.
15 minutes after I put the cake into the oven, the top has already turned quite brown. I have to cover it with aluminium foil. At 20 minutes, I take out to check but the cake is still not fully baked. I lower the cake to the most bottom rack and bake for another 10 minutes. I'm glad that the cake turns out fine. It's light and spongy and better than the chocolate banana muffins (see below).
Banana Butter Sponge
(Original recipe from Fruity Cakes by Alex Goh)
Ingredients
(A)
120g sugar (I use 60g)
1/2 tbsp SP cake emulsifier (I omit this)
(B)
4 eggs (I use 120g eggs)
120g cake flour (I use 60g)
1/2 tsp baking powder (I use 1/4 tsp)
(C)
120g mashed banana (I use 60g)
1/4 tsp baking soda (I use 1/8 tsp)
(D)
85g melted butter (I use 40g vegetable oil)
Method
1. Mix (A) until well blended. Add (B) and whip till light and fluffy.
2. Add (C) and mix until well combined.
3. Stir in (D) and mix until well blended.
4. Pour the batter into greased cup cake moulds. Bake at 180C for 20 minutes. Remove from the moulds immediately.
And this is the chocolate banana muffins I'm talking about earlier. Hm... I don't really like the results and its taste. It tastes like the vegan chocolate cake I had done before. I have come to a conclusion that chocolate cakes that do not use butter do not taste very good. It's just not the taste that I like. Shall not post any recipe for this. Ok.
Tuesday, January 01, 2008
Happy 2008!
1 January 2008
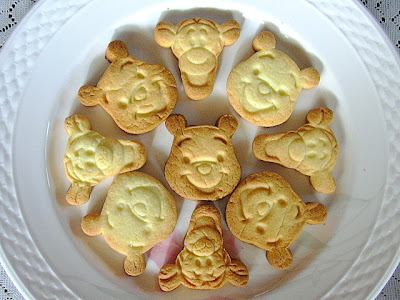
Here comes the first post of the year 2008. I got 2 sets of new disney cookie cutters on Christmas and today is the best day to try it out.
Got the recipe from Happy Homebaker. And it was indeed not an easy task to make the cookies. For me, I was able to cut out and stamp the face quite easily without sticking. But I had problem lifting the cookies up to place them on the baking tray, especially for Tigger. Most of the time, I either broke them or they would become out of shape. I found that the cookies couldn't be too thin as they would break even more easily.
After some effort, this was the result. I realized that I should have pressed the face harder as the facial expressions were not very clear and deep. I also noticed that my cookies look cracked, as compared to Happy Homebaker's. I wonder why is it so? Nevertheless, I thought they all look very cute and taste very buttery and crunchy as I added extra cornflour.
With extra egg white left, I use it to make almond crisps. Remember the last time I failed? No problem of sticking for this time as I have used the Glad baking paper. I prefer these to almond tuiles as they do not lose crispiness easily.
Wow, these 2 cookies seem to make excellent Chinese New Year cookies. That will be my plan for CNY. :)
Happy New Year to everyone!