Tuesday, November 18, 2014

Bangkok 2014 Day 2: BTS and Erawan Shrine

Day 2: 4 May 2014 (Sun)

As a first-time visitor to Bangkok, of course I must visit all the must-see places here. Since my second day was a Sunday, the only place to go would be the Chatuchak Weekend Market and also stopover at the Or Tor Kor Market nearby. Before that, we would make a visit to pray at the Erawan Shrine first. All these places are accessible by BTS, so we bought a One-Day Pass for unlimited rides in 1 day. To make full use of the pass, we would also visit the Asiatique The Riverfront night market.

BTS

This is a map of the National Stadium BTS station. See the red arrow I made in the map? That's how near our hotel is from the station. The hotel states that it is 90 steps walking distance to the station. Never counted haha!

If you notice, there's an escalator sign too. The escalator happens to be going upwards, lucky! Why lucky because after taking BTS for 1 whole day, I realize that there are only very few escalators at the stations. And the escalators don't come in 2 directions. For example at this station, only exit 1 has one escalator going up, other exits from 2-4, only stairs. As a result, we had to climb "a bit" of stairs. I must say my mum is really fit for her age. Although slow, she managed to climb all the stairs, I wonder if I can be as fit as her when I reach that age. Lol! Enough complaints, Singaporeans are very lucky right? But the good thing is all the BTS stations and shopping malls are connected by the skywalk. You can walk and shop all the way in the shelter and have a good view of the city standing above.


So first thing in the day, we got up the station and bought our One-Day Pass at 130baht (~$5.02) for unlimited rides on the date of issue.
You can check the fares and travel times online here.
For maps around the BTS stations (like the map above), you can visit here.


Erawan Shrine 四面佛

We were going to Erawan Shrine by taking BTS from National Stadium to Chit Lom. We had to change train at Siam station. Pretty easy as there are only 2 BTS lines. The view of Siam Paragon from Siam station. Can't believe we stayed so near but didn't have time to shop here and Siam Square in this trip! Good excuse to go back again!


After alighting at Chit Lom, look for exit 2, walk along the skywalk and take the stairs down.


Continue to walk straight until you see a row of stalls selling flowers and incense for praying and you are there.


We bought 2 sets for praying which cost 20baht (~$0.79) each. Each set comes with 1 candle, 12 joss sticks and 4 mini garlands to be offered to the four-faced God.


At the entrance of the very famous Erawan Shrine housing the four-faced Brahma God.


The neverending crowd of people coming here to pray, hoping for wishes to be fulfilled.


Lighting the candle and the joss sticks.


It is said that the four-faced God will grant all good wishes. So if you have a wish in your mind, you can pray and ask for it. Do be precise in what you want to get and also what you want to return if your wish is fulfilled. It is a must to come back to either make offerings from flowers, fruits to elephants or hire Thai dancers if your prayer is answered.

What each face of the God represents: 1 career, 2 love, 3 wealth, 4 health.


If you want to know more about how to pray, you can check out some YouTube videos in Chinese.
https://www.youtube.com/watch?v=RLCxZn1EXOc
https://www.youtube.com/watch?v=fwYcO7TXASc

For us, as we do not have any wishes, we just pray for good health and safety for this trip. Not sure if it's the correct way. We place the candle at the first God, pray and offer a flower garland and joss sticks to each God. Continue praying in clockwise direction to all 4 Gods.

Offerings for the God.


Worshipping with the Thai dancers.


Toss some coins and wash your hands and face with the holy water.


BTS passing by.


From here, you can continue to walk to Big C, CentralWorld and even further to Platinum Fashion Mall. But we had other plans today, so had to skip these areas. Cos we were going to the biggest weekend market - Chatuchak!

Next: Chatuchak Weekend Market

Tuesday, September 30, 2014

Neapolitan Chiffon Cake

My forever boring chiffon cake. ;p

Sorry if I really bored you with my bakes. Cos whenever I feel like baking, chiffon cake is always the first in my mind. Unfortunately, I love baking and eating chiffon cakes most of the time.


Maybe it's not so boring... Look!


Inspired by the Neapolitan ice cream which was is still my childhood favourite, I make a Neapolitan version of chiffon cake made up of vanilla, strawberry and chocolate layers.


I'm glad that the layers turn out quite well and even. Will share a little trick later.


Neapolitan Chiffon Cake

Ingredients: (17cm chiffon tin)

3 egg yolks (about 60g)
20g caster sugar
50ml vegetable oil
50ml milk/water
90g cake flour, divide into 3 portions 30g each

1 tsp vanilla extract
1/2 tsp strawberry powder
1 tsp cocoa powder

4 egg whites (about 160g)
50g caster sugar

Method:

1. Whisk egg yolks and sugar until the sugar dissolves.
2. Gradually add in vegetable oil, followed by milk/water.
3. Divide the batter in step 2 into 3 equal portions. (My batter weighs about 180g, so divide into 60g portion each).
4. For vanilla batter - add in 30g flour and vanilla extract.
For strawberry batter - add in 30g flour and strawberry powder.
For chocolate batter - remove 1 tsp of flour from 30g flour, add in the remaining flour and 1 tsp cocoa powder.
5. Mix all batters well and set aside.

6. In another bowl, whisk egg whites until foamy. Add in sugar gradually and continue whisking until stiff peak form.
7. Divide the whisked egg white in step 6 into 3 equal portions. (My egg white batter weighs about 210g, so divide into 70g portion each *see below*).
8. Gently fold in the egg white into the egg yolk batters (in step 5). Be gentle but quick to avoid the egg whites deflating.
The 3 batters
9. Pour the batters into an ungreased chiffon tin layer by layer. Give the tin a few slight knocks on the tabletop to remove air bubbles. Bake in preheated oven at 170 deg C for 35 minutes or 160 deg C for 40 minutes.
10. Remove from oven and invert the tin immediately onto a cooling rack.
11. Unmould the cake only when it is completely cool.

** For step 7, instead of dividing the egg whites equally, I divided them in 60g, 70g and 80g portions. Add the lesser 60g portion to the vanilla batter which is at the bottom of the tin during baking, 70g portion to the strawberry batter, and 80g portion to the chocolate batter which is at the top of the tin during baking. This is to get the layers as even as possible. You may adjust depending on how you want which colour to be in which layer. You may also omit this step.

Adapted from: 好吃戚风蛋糕轻松上手

Monday, September 08, 2014

Mooncakes 中秋月饼 2014

It's Mid-Autumn again!

I have made some mooncakes since last week. Before that, a shopping trip to Kwong Cheong Thye is a must. They have so many different types of mooncake pastes, some quite unusual. You can try the samples before deciding which flavour is suitable for you. Best of all, they sell in 500g packets so you can get more varieties. They have all other ingredients to complete the mooncake-making shopping, including the moulds and packaging too. The location is few steps away from Aljunied MRT, along the shophouses.

These are what I got here. This year I bought Hong Kong low sugar white lotus, chocolate and the special red dates and longan flavour!

I also made a trip to Kitchen Capers because I wanted to get the mooncake mould badly (see below). So pretty! :) Bought the snowskin premix wanting to make snowskin mooncakes this year. But but but... I couldn't get shortening. Blame myself only went to buy 1 day before making. The places I went to all sold out. Stupid me never get kaofen also as it is needed for dusting. So the plan failed! Mum said she likes baked mooncakes better and can keep better, so I ended up making all baked ones. Lol!


Using the same recipe as last year from Anncoo Journal. Getting ready to start. Just mix and leave the mixture to rest.


I am making the very popular Baked Chocolate Mooncakes too!


While waiting, steam the salted egg yolks and weigh and wrap the lotus pastes.


My chocolate mooncakes. They smell heavenly even before baking with the Valrhona cocoa powder.


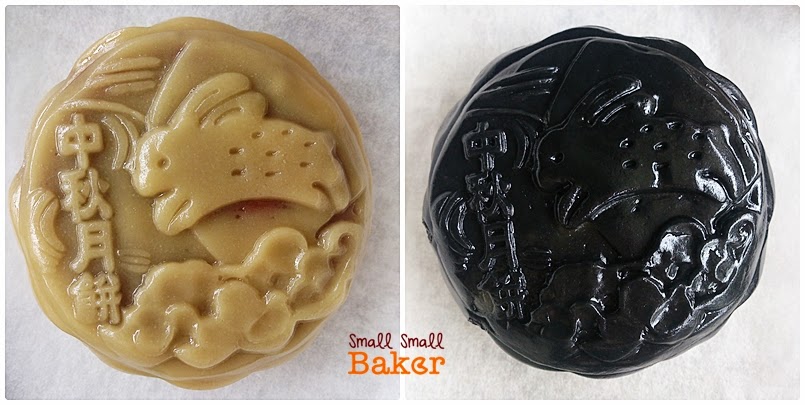
Using my favourite design plates 中秋 and 莲蓉 for the traditional mooncakes.


The new mooncake mould. Have been using plunger type and not used to this mould. Didn't do a very good job. I used 140g (50g skin, 75g paste, 15g yolk) but not quite enough to fill the mould up. Perhaps can try 150g next year. Added charcoal powder to one mooncake.


The mooncakes freshly baked. Need to rest them for at least 2 days to soften.


The mooncakes after 2 days! Time for photo-taking before sending away. :)


The left one is red dates and longan. A new flavour which my mum and her friends like very much. Middle is low sugar white lotus, not sweet and very smooth. The right is chocolate, my nephew and nieces (and me too) love love love! Guess it's a must to make chocolate mooncakes next year.


The bigger mooncake which can put in a whole egg yolk. but as I didn't fill up the mould, the yolks look a bit crushed. Nevermind improve next year.


Baked chocolate Mooncakes

Ingredients: (I make 12pcs, each 20g skin 40g paste)

113g Plain flour
18g Cocoa powder (I used valrhona cocoa powder)
85g Sugar syrup
25g Peanut oil
1/2 tsp Alkaline water
480g lotus paste, divided into 12 portions

Method:

1. Mix sugar syrup, peanut oil and alkaline water together thoroughly.
2. Sift plain flour and cocoa powder in a bowl. Make a well in the center and pour sugar syrup mixture. Using a rubber spatula to mix and form to a soft dough. Cover with a cling wrap and let it rest for 30 minutes.
3. Divide dough into 12 portions, 20g each and roll into balls. Wrap the dough around the lotus paste.
4. Roll it into ball and dust with some flour. Press firmly into mould, unmould and place on a lined baking tray.
5. Bake at preheated oven 170C for 10 minutes. Remove from oven and rest mooncakes to cool for about 15 minutes. Then bake the chocolate mooncakes again for another 10-15 minutes.
6. Leave mooncakes to cool down completely before storing into an airtight container. This mooncake can be eaten immediately and taste cripsy. Wait for about 3 days for the mooncakes for skin to soften (回油) before serving.

Recipe from: Anncoo Journal
Original from: Cass @ 揾到食

Wishing everyone Happy Mid-Autumn Festival!
但愿人长久,千里共婵娟,中秋节快乐!

Monday, August 25, 2014

Pandan Chiffon Cake & Pandan Sponge Cupcakes

Few weeks ago, mum chopped off her old pandan plant and we were left with a big bunch of pandan leaves. So I took some from her and made some pandan cakes.

Use about 15-20 pandan leaves (the more the better), wash and cut into small pieces for easier blending.


I use electric blender, blend the pandan leaves with about 300ml water. Although we do not need so much pandan juice, we need to add water to get the blender to work, if not the pandan leaves will get stuck without moving for my blender.

After done, filter and squeeze the mixture through a sieve to get the clear pandan juice. Discard the remains. Leave the pandan juice in the fridge overnight or few days even better. I forget to take a photo, but you will get a distinct 2 layers of juices, the top is a clear layer while the bottom is a denser green layer of pandan juice which we will use for the cakes. It's called the homemade pandan extract.


First and always, my favourite chiffon cake.


I use a recipe that is very popular on FB originated from Caryn Man Yoke Peng. There is some similarity between this and the Okashi's recipe, both yield very soft chiffon cakes!

Pandan Chiffon Cake (20cm chiffon tin)

Ingredients:

5 egg yolks
30g sugar
50g oil
70g homemade pandan extract
83g cake flour

5 egg whites
70g sugar

Method:

1. Whisk egg yolks and sugar until the sugar dissolves.
2. Gradually add in vegetable oil, followed by homemade pandan extract. Mix well.
3. Add sifted cake flour. Mix until just combined. Set aside.
4. In another bowl, whisk egg whites until foamy. Add in sugar gradually and continue whisking until stiff peak form.
5. Gently fold in the egg white into the egg yolk batter (in step 3) in 3 batches.
6. Pour the batter into an ungreased chiffon tin. Give the tin a few slight knocks on the tabletop to remove air bubbles. Bake in preheated oven at 170 deg C for 35 minutes. (If your oven is hot, try 160 deg C for 40 min or 150 deg C for 45 min)
7. Remove from oven and invert the tin immediately onto a cooling rack.
8. Unmould the cake only when it is completely cool.


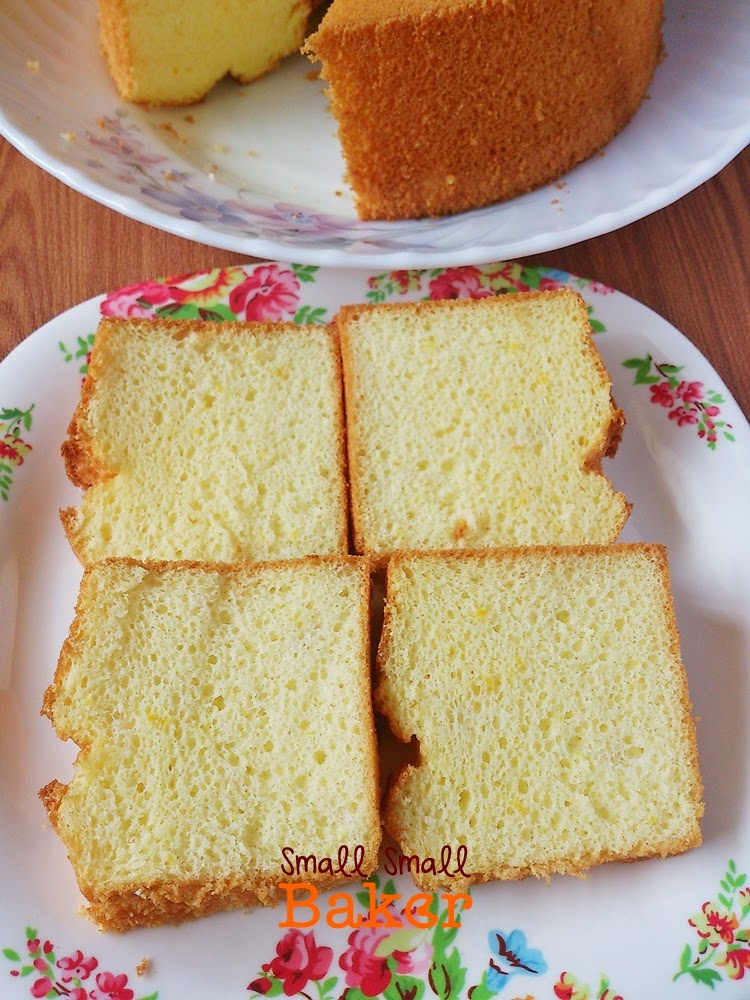
See how I'm 'torturing' my chiffon cake. Hehe! It's super soft


Pandan sponge cupcakes made 100% extracted from pandan leaves and all natural colouring.


This cake uses beating the whole egg method which I actually don't like to make. Cos I always find it hard to fold in the flour nicely. However, this time I did it without much problems, maybe more experience now. The result is also moist and fluffy. A good alternative if I feel lazy to do egg separation method.


Pandan Sponge Cupcakes (about 10 cups)

Ingredients:

2 large cold eggs
50g sugar
pinch of salt
65g cake flour
25g homemade pandan extract
15g oil

Method:

1. Whisk eggs, sugar and salt at high speed until white and fluffy, about 15 minutes.
2. Fold in sifted cake flour gently until the mixture is smooth and no traces of flour.
3. Mix homemade pandan extract and oil well. Scoop some batter from step 2 into the pandan mixture. Mix well. Then pour the mixture back to the batter. Fold in gently till smooth and well combined.
4. Scoop the batter into paper cups until almost full.
5. Bake in preheated oven at 170 deg C for 20 minutes. (adjust time according to the size of the baking cups)

Recipe adapted from: Butter . Flour & Me

Sunday, August 17, 2014

Non-spicy Kid-friendly Curry Chicken with Roti Prata

I have been cooking this instant curry chicken almost every week cos my choosy nieces can finish their meal very fast if they eat this! I admit I love it too cos it's so quick and easy. Instant sauces are perfect for me who can't cook very well!


I bought this Prima Taste Nonya Curry Paste from Giant at $1.75 for a 80g packet. The spicy level stated is mild. So I think the kids will be able to take it. Indeed, it is not spicy at all and very kid-friendly and for those who die-die want to eat curry but cannot take spicy food (me lor, hehe)! Maybe not shiok enough for spicy food lovers though.


I don't really have a recipe when it comes to cooking. Just roughly followed the instructions at the back of the packet. I believe you can always adjust according to your own preference.

Ingredients & Method for 2 small servings:

1. Dissolve 1 heaped tablespoon of curry paste in 220ml of boiling water in a pan. (please add more paste if you prefer a thicker version, mine is totally served for children.)

2. Add in 4 mid-joint chicken wings (marinated with 1/2 tsp salt), 2 small potatoes cut into bite sizes, 2-3 stalks of curry leaves. Cook till boiling and reduce to lower heat, cover and cook for 10 minutes.


3. Add in 80ml coconut milk (I use 1 tbsp milk powder dissolved in 80ml water). Add in 1 tbsp of sugar and 1/2 tsp salt. Cook uncovered for another 8 minutes or till chicken is cooked, potatoes are softened and gravy thickened.

4. Pan-fry frozen roti prata on both sides till golden brown. And serve!


My Instagram video. Can you smell it?


Another photo of my homecooked curry chicken with roti prata. The Fairprice roti prata quite good. Thin and crispy. Delicious meal!


Thursday, July 17, 2014

Orange Chiffon Cake 香橙戚风蛋糕

My initial intention to come up with a series of chiffon cakes recipes failed. Haha! It is just so hard to keep up with blogging.

Anyway, I do bake chiffon cakes very often because my mum loves chiffon cake cos it is lighter and healthier and I love baking it because it is easy to make within an hour with minimal washing, minus the challenge of baking it, hehehe!

After trying different flavours of chiffon cakes, my mum told me that she still prefer orange chiffon cake, the rest so so only. What! You win liao lor! ;P

So I bake this orange chiffon cake for her, despite my desire to try another new flavour. Hahaha!


I am back to using my all-time favourite recipe book "好吃戚风蛋糕轻松上手". Because its 17cm recipe fits so nicely for my tin. Other recipes, if I make adjustment, will either come out too short or too tall. The proportion of flour also not too low and makes the cake more stable and easy to succeed. The extra egg white also makes the cake fluffier. No baking powder and cream of tartar are used, I haven't been adding these to my chiffon cakes for a long long time.


Orange Chiffon Cake

Ingredients: (17cm chiffon tin)

3 egg yolks
20g caster sugar
35ml vegetable oil
1 tsp Cointreau
60ml freshly squeezed orange juice
1/2 tsp orange zest (I used zest of 1 whole orange)
80g cake flour

4 egg whites
50g caster sugar (I used 40g)

Method:

1. Whisk egg yolks and sugar until the sugar dissolves.
2. Gradually add in vegetable oil, followed by Cointreau, orange juice and zest.
3. Add sifted cake flour. Mix until just combined. Set aside.
4. In another bowl, whisk egg whites until foamy. Add in sugar gradually and continue whisking until stiff peak form.
5. Gently fold in the egg white into the egg yolk batter (in step 3) in 3 batches.
6. Pour the batter into an ungreased chiffon tin. Give the tin a few slight knocks on the tabletop to remove air bubbles. Bake in preheated oven at 170 deg C for 35 minutes.
7. Remove from oven and invert the tin immediately onto a cooling rack.
8. Unmould the cake only when it is completely cool.

Adapted from: 好吃戚风蛋糕轻松上手

Photobucket

I'm linking this post to Bake Along #64: Chiffon Cakes jointly hosted by Joyce of Kitchen Flavours, Zoe of Bake for Happy Kids and Lena of Frozen Wings


Sunday, July 06, 2014

Japanese Cotton Cheesecake

I bought cream cheese while it was on offer some time ago. Better quickly use it up. It had been a long time I last bake a cheesecake and I'm craving for one! I'm sticking to a trusted recipe by Alex Goh. I remember I saved a photo of the recipe from the book... BUT I can't find it! Have been keeping too many recipes everywhere and never organize. Anyone has this problem? Haha!

It's ok. I think can easily find the recipe online. :)

Some bakers might have faced problems when baking this cheesecake. I have this phobia too! Scared it will crack, scared it will sink, scared it become dense... Although I rarely make cheesecake, I have more experience in whipping egg whites now, so that makes the task less intimidating. :)


My cheesecake turns out to be pretty good, except for a little crack. I should have stay beside the oven and turn down the temperature. There's uneven browning at the top too. Can't help because of my oven. Or is there a way to brown it nicely? Mostly importantly, it is tall and did not sink! Yeah!


Here's a slice of the cut-out cheesecake. So soft, cottony and melt-in-the-mouth. It's so good when it's chilled! Eating cheesecake is like eating durian. Either you like or hate it. Luckily I like both! Just realize 2 of my nieces are cheesecake lovers. One of them said my cheesecake tastes like the Starbucks one wor. You sure or not? Lol! :p


Japanese Cotton Cheesecake

Ingredients: (I use 6 inch round pan and use 3/4 of the original recipe in brackets)

125g cream cheese (160g)
18g butter (25g)
90g milk (120g)

30g cake flour (40g)
23g cornflour (30g)

3 egg yolks (4)

3 egg whites (4)
1/8 tsp cream of tartar (1/8 tsp), I omitted
75g sugar (100g sugar)
pinch of salt, I omitted

Preparation:

1. Grease and line the bottom and side of the pan with baking paper. Wrap outside of the pan in foil.
(I did not wrap the pan in foil as I prefer to use a normal pan instead of removable base pan.)

2. Place a tray with water at the lowest rack and preheat the oven.
(I did not put the pan in water-bath. I place the tray of water at the lowest rack and the pan at the middle rack.)

Method:

1. Place cream cheese, butter and milk in mixing bowl and double-boil until the mixture becomes thick and creamy and no lumps. Set aside to cool.
(From my experience, it's difficult to get a lump-free mixture. You can pass the mixture through a sieve to get a smooth mixture. For lazy me I just skip it as the lumps will disappear after adding the flour and eggs.)

2. Add in sifted flour mixture and whisk until combined. Do not overmix.

3. Add in egg yolks and whisk until combined. Set aside.

4. Whisk the egg whites until foamy. Add in sugar gradually and whip until soft peaks. Do not whip to stiff peak. Fold the egg whites into the cheese mixture gently in 3 separate additions.

5. Pour the batter into the pan, knock a few times to get rid of air bubbles. Bake in oven at 160C for 45 minutes until the top is golden brown and skewer inserted is clean.
(I bake at 160 deg C, lower to 150 deg C once I spotted crack on the cake, should have reduced earlier. Total baking time is 35 minutes for my 6 inch cake.)

6. Off the oven and leave the cake in the oven with the door slightly ajar for about 30 minutes. Remove the cake from pan, remove the baking paper and further cool down before chilling in the fridge.
(I did not remove the cake from oven immediately to prevent the cake from sinking quickly.)

Adapted from:Fantastic Cheesecake by Alex Goh

I am submitting this post to "My Treasured Recipes #1 - Alex Goh (June/July 2014)" hosted by Miss B of Everyone Eats Well In Flanders and co-hosted by Charmaine of Mimi Bakery House.