Tuesday, September 30, 2014

Neapolitan Chiffon Cake

My forever boring chiffon cake. ;p

Sorry if I really bored you with my bakes. Cos whenever I feel like baking, chiffon cake is always the first in my mind. Unfortunately, I love baking and eating chiffon cakes most of the time.


Maybe it's not so boring... Look!


Inspired by the Neapolitan ice cream which was is still my childhood favourite, I make a Neapolitan version of chiffon cake made up of vanilla, strawberry and chocolate layers.


I'm glad that the layers turn out quite well and even. Will share a little trick later.


Neapolitan Chiffon Cake

Ingredients: (17cm chiffon tin)

3 egg yolks (about 60g)
20g caster sugar
50ml vegetable oil
50ml milk/water
90g cake flour, divide into 3 portions 30g each

1 tsp vanilla extract
1/2 tsp strawberry powder
1 tsp cocoa powder

4 egg whites (about 160g)
50g caster sugar

Method:

1. Whisk egg yolks and sugar until the sugar dissolves.
2. Gradually add in vegetable oil, followed by milk/water.
3. Divide the batter in step 2 into 3 equal portions. (My batter weighs about 180g, so divide into 60g portion each).
4. For vanilla batter - add in 30g flour and vanilla extract.
For strawberry batter - add in 30g flour and strawberry powder.
For chocolate batter - remove 1 tsp of flour from 30g flour, add in the remaining flour and 1 tsp cocoa powder.
5. Mix all batters well and set aside.

6. In another bowl, whisk egg whites until foamy. Add in sugar gradually and continue whisking until stiff peak form.
7. Divide the whisked egg white in step 6 into 3 equal portions. (My egg white batter weighs about 210g, so divide into 70g portion each *see below*).
8. Gently fold in the egg white into the egg yolk batters (in step 5). Be gentle but quick to avoid the egg whites deflating.
The 3 batters
9. Pour the batters into an ungreased chiffon tin layer by layer. Give the tin a few slight knocks on the tabletop to remove air bubbles. Bake in preheated oven at 170 deg C for 35 minutes or 160 deg C for 40 minutes.
10. Remove from oven and invert the tin immediately onto a cooling rack.
11. Unmould the cake only when it is completely cool.

** For step 7, instead of dividing the egg whites equally, I divided them in 60g, 70g and 80g portions. Add the lesser 60g portion to the vanilla batter which is at the bottom of the tin during baking, 70g portion to the strawberry batter, and 80g portion to the chocolate batter which is at the top of the tin during baking. This is to get the layers as even as possible. You may adjust depending on how you want which colour to be in which layer. You may also omit this step.

Adapted from: 好吃戚风蛋糕轻松上手

Monday, September 08, 2014

Mooncakes 中秋月饼 2014

It's Mid-Autumn again!

I have made some mooncakes since last week. Before that, a shopping trip to Kwong Cheong Thye is a must. They have so many different types of mooncake pastes, some quite unusual. You can try the samples before deciding which flavour is suitable for you. Best of all, they sell in 500g packets so you can get more varieties. They have all other ingredients to complete the mooncake-making shopping, including the moulds and packaging too. The location is few steps away from Aljunied MRT, along the shophouses.

These are what I got here. This year I bought Hong Kong low sugar white lotus, chocolate and the special red dates and longan flavour!

I also made a trip to Kitchen Capers because I wanted to get the mooncake mould badly (see below). So pretty! :) Bought the snowskin premix wanting to make snowskin mooncakes this year. But but but... I couldn't get shortening. Blame myself only went to buy 1 day before making. The places I went to all sold out. Stupid me never get kaofen also as it is needed for dusting. So the plan failed! Mum said she likes baked mooncakes better and can keep better, so I ended up making all baked ones. Lol!


Using the same recipe as last year from Anncoo Journal. Getting ready to start. Just mix and leave the mixture to rest.


I am making the very popular Baked Chocolate Mooncakes too!


While waiting, steam the salted egg yolks and weigh and wrap the lotus pastes.


My chocolate mooncakes. They smell heavenly even before baking with the Valrhona cocoa powder.


Using my favourite design plates 中秋 and 莲蓉 for the traditional mooncakes.


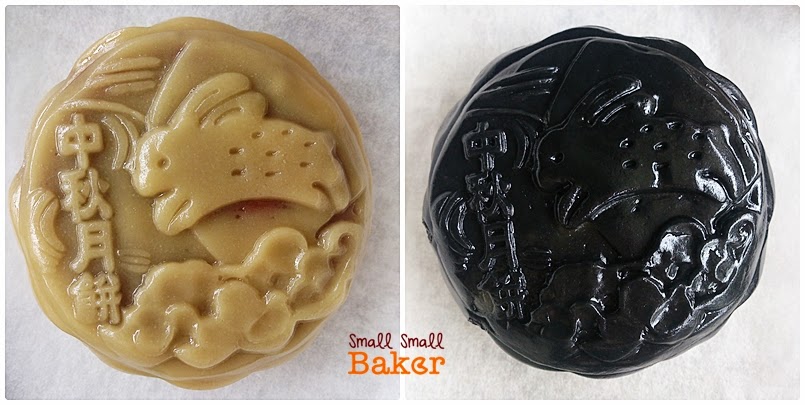
The new mooncake mould. Have been using plunger type and not used to this mould. Didn't do a very good job. I used 140g (50g skin, 75g paste, 15g yolk) but not quite enough to fill the mould up. Perhaps can try 150g next year. Added charcoal powder to one mooncake.


The mooncakes freshly baked. Need to rest them for at least 2 days to soften.


The mooncakes after 2 days! Time for photo-taking before sending away. :)


The left one is red dates and longan. A new flavour which my mum and her friends like very much. Middle is low sugar white lotus, not sweet and very smooth. The right is chocolate, my nephew and nieces (and me too) love love love! Guess it's a must to make chocolate mooncakes next year.


The bigger mooncake which can put in a whole egg yolk. but as I didn't fill up the mould, the yolks look a bit crushed. Nevermind improve next year.


Baked chocolate Mooncakes

Ingredients: (I make 12pcs, each 20g skin 40g paste)

113g Plain flour
18g Cocoa powder (I used valrhona cocoa powder)
85g Sugar syrup
25g Peanut oil
1/2 tsp Alkaline water
480g lotus paste, divided into 12 portions

Method:

1. Mix sugar syrup, peanut oil and alkaline water together thoroughly.
2. Sift plain flour and cocoa powder in a bowl. Make a well in the center and pour sugar syrup mixture. Using a rubber spatula to mix and form to a soft dough. Cover with a cling wrap and let it rest for 30 minutes.
3. Divide dough into 12 portions, 20g each and roll into balls. Wrap the dough around the lotus paste.
4. Roll it into ball and dust with some flour. Press firmly into mould, unmould and place on a lined baking tray.
5. Bake at preheated oven 170C for 10 minutes. Remove from oven and rest mooncakes to cool for about 15 minutes. Then bake the chocolate mooncakes again for another 10-15 minutes.
6. Leave mooncakes to cool down completely before storing into an airtight container. This mooncake can be eaten immediately and taste cripsy. Wait for about 3 days for the mooncakes for skin to soften (回油) before serving.

Recipe from: Anncoo Journal
Original from: Cass @ 揾到食

Wishing everyone Happy Mid-Autumn Festival!
但愿人长久,千里共婵娟,中秋节快乐!