Pages

Monday, December 31, 2012

8 December 2012 - Legoland Malaysia (Part 1)

I want to end 2012 with a very fun post!

I went to Legoland Malaysia on 8 December 2012 with my family. We went on a tour package that picked us up at Jurong East at about 8.45am. By the time we reached Legoland, it was already past the opening hour at 10am.

Legoland is larger than Universal Studios Singapore. The park is divided 7 themed zones. Due to the crowd and the long waiting time for queues, and also that the place is really large with many rides and activities, we missed 2 themed zones - Land of Adventure & LEGO Technic - entirely.

** The Beginning **

The Beginning is the area at the entrance where there are shops and The Cafe for western snacks. After you walk past The Beginning, you can choose to go left or right. Families with children are *recommended (see note at the end) to turn right towards LEGO City as the rides are more suitable for young children.

As we turned right, we saw this amazing Christmas Tree made up of Lego pieces.


** LEGO City **

Here, my nieces immediately queued up for the Junior Driving School (for 3-5 yrs). For kids older than 6 yrs, they can go for the Driving School with bigger driving area with traffic lights too.


The Boating School is a popular ride with never-ending queue, so we missed it. And they went to The Shipyard which is a playground for children to run around. Note that there is a playground at each themed zone which I like and find it very special. Kids who are not going for the rides can have a place to play and adults can take a rest too. Opposite The Shipyard is the Market Restaurant a good place to have your meals.


Next, we went to take the LEGOLAND Express train which brings us for a scenic ride around the park. The queue is long but the train comes quite frequently and can take in quite many passengers so the waiting time is ok. We also took the LEGO City Airport ride (no photo), which is a spinning ride and you can control the height of the plane. Nothing much actually.


** Imagination **

By then, it was already past lunch time, so we skipped The Land Of Adventure and cut across the Miniland to the Imagination zone for lunch at Pizza Mania.


Outside Pizza Mania, the Imagination zone is lots of fun with many LEGO structures for photo-taking.


But of course, the kids are more interested in this DUPLO Playtown. Let me warn you, if you let your kids enter, it will be very difficult to get them out. Cos it is a very large and sheltered playground with lots of playing area to run, climb, slide and crawl!! It's ok, adults can rest here and away from the sun or rain. It's a bit hot though. There's also another mini train ride the DUPLO Express (no photo).


We finally persuaded them to leave the playground. We wanted to go up the Observation Tower but the queue was scary. The LEGO Studios 4D show had super long queue as well. No choice, we had to miss it and escape the heat at the air-conditioned Build & Test where the kids can build cars to see if it can go fast and build a building and test if it can withstand a simulated earthquake.


** LEGO Kingdoms **

When we finally reached LEGO Kingdoms, it was already 4pm plus. No time! So we split. My older niece went to ride The Dragon rollercoaster and my younger nieces went for a kiddy horse ride. the Royal Joust. We also ride the Merlin's Challenge, a high speed carousel, quite fun to me, at least not as scary as rollercoaster which I won't take. Haha!


Time really really flies here. It was already 5.30pm, and we had 1 hour left as we need to catch our coach back at 6.30pm. We went to the Miniland, a must visit to end the day. I took many many photos, so I shall save everything about the Miniland on my next post.

So to sum up, the kids and me too, enjoyed Legoland very much. We were lucky to have a nice hot weather without rain. Time is really not enough to explore the whole area. I have a feeling that the rides here are pretty short. We need to queue many minutes just for a short 1-5 minutes ride. I think rides at the Universal Studios Singapore are longer and more enjoyable to me. And a *note as stated above, if I were to visit again, once I enter the park, I will go straight towards IMAGINATION to go up the tower and to the 4D show which I really wanted to try. :(

A Happy New Year to everyone!

Tuesday, December 25, 2012

Merry Christmas with cutout butter cookies!

I have been busy recently with a major spring cleaning to get ready for a repaint in the house in January. So there is not much chance for baking from now till end of January maybe.

But I really want to make use of my new cookie cutters. :P So since it is school holidays now, and my nieces still want to make some Christmas cookies on their own, we make these Christmas butter cookies together for fun.


All these cookies are made by them, with some help from me. I must say they did a great job (they are only 3 years old)! It helps that the cutters are extremely easy to use and the recipe from HHB is also very good as the dough is easy to manage.

Cutout Butter Cookies

Ingredients (about 35 pieces):

100g butter, softened at room temperature
80g caster sugar
1 egg yolk
180g cake flour
20g corn flour

Method:
1. Cream butter and sugar till fluffy.
2. Whisk in egg yolk.
3. Fold in sifted flours. Knead to form a dough, wrap and chill for a while.
4. Roll out the dough and cut out cookies with cookie cutters.
5. Bake at 175 deg C for 15 minutes till light golden brown.

Recipe adapted from: HHB


Here I wish everyone:

Merry Christmas and a great year in 2013!!

Sunday, December 02, 2012

Homemade Soymilk with Joyoung


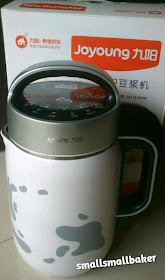
I got my Joyoung soymilk maker finally, with help from someone who went for a trip to China recently. The model we got is DJ11B-D30D. Actually, I'm still quite confused about all the different models. As long as it can make soymilk, I'm quite satisfied. :)


This model belongs to the 植物奶牛 series, a newer model with latest grinding technology and the soy milk produced is extremely thick and appetizing (a reader told me about this). It has functions like dry beans 干豆, soaked beans 湿豆, grains 五谷, juice 果汁, jam 果酱, milk tea 奶茶 and easy washing 轻松洗. It doesn't have rice paste 米糊 but can use grains 五谷 for this. It also doesn't have cream soup 浓汤. I must find out how I can do it.


Before I got my soymilk maker, I saw this book "十三亿人都在喝的神奇养生豆浆" selling at Popular bookstore with discount for members, so I bought it. I will be referring to this book very frequently for recipes using Joyoung maker.

Here's my Homemade Soymilk 黄豆豆浆 using Joyoung for the first time.

Homemade Soymilk 黄豆豆浆
Anti-oxidant, anti-aging 抗氧化,抗衰老

Ingredients:
80g soybeans
15g sugar

Method:
1. Soak soybean overnight, remove membrane/skin, rinse a few times till clean.
2. Add the soybean into the maker, fill water up to 1000ml mark.
3. Select soaked bean function and start. It takes only 25 minutes.
4. When done, filter the soymilk. Add in 15g sugar, stir till dissolved and serve!

Saturday, December 01, 2012

Bake King Open House Demo Classes

Bake King had celebrated their 60th anniversary over the last weekend and I attended 2 of their open house demo classes.

I signed up 2 classes that interest me very much. One is the Chocolate Hokkaido Cupcakes, where we learnt how to bake the chiffon cake and make the pastry cream from instructor Gina Tan. You know I'm very much a chiffon cake fan and it's great to learn more about it. The cake is delicious!


The other is the Ribbon Fondant Cake. I have always wanted to learn more about making fondant cakes but very hesitant to try out. Really learnt a lot from the experienced instructor Tricia Tjhin. See how beautiful the cake is!


I also received their 60th anniversary recipe book and an apron. Plus I got to enjoy a few desserts. It was a very fun day! Thank you Bake King!

Friday, November 23, 2012

M&M Cookies - blogging from mobile


This post is entirely created from mobile phone using blogger app, including taking and editing the photo too. I wonder how it will appear on the screen. As I do not have access to a computer now until I get a new one, I'm relying on my phone for everything. Since some things cannot be done using a phone, please forgive if I did not reply here or my fb.

Back to this M&M cookies, they were baked for little kids graduation party for gift exchange. I like them nice, buttery and crunchy.

Ingredients (about 40pcs):
110g butter
70g sugar
50g egg
200g cake flour
4g baking powder
M&M chocolate

Method:
1. Cream butter and sugar till fluffy.
2. Whisk in eggs.
3. Fold in sifted flour and baking powder. Knead to form a dough, wrap and chill for a while.
4. Take 10g of dough. Roll round and flatten slightly. Press in M&M.
5. Bake at 180 deg C for 15 minutes.

Recipe adapted from: Lucky Inn

Friday, November 09, 2012

Guest post: Cartoon Butter Cookies

I have been invited by Dee of PruneNurture to write a guest post for her blog. Dee was my secondary school classmate and we were very good friends then. We lost touch for a few years and found each other on Facebook. She is now married with a very cheerful and active little girl, Dot. She now blogs about her parenting experience and the growing journey of her girl. Her blog is also one of the finalist for the Nuffnang Asia-Pacific Blog Awards 2011 for the Best Parenting Blog.

When she invited me to do a guest post for her, I agreed immediately. Since her blog is about children and parenting, I decide to share a recipe that parent and child can bake and bond together. Baking is a wonderful activity for children. Baking gives children the opportunity to pick up lots of skills, such as identifying ingredients, concept of math - like measuring weight and volume, temperature and time. Different ages of children can also perform simple motor skills like sifting, stirring, pouring, cutting and decorating. What's more they can enjoy the product of their hardwork!

Here's a simple butter cookie recipe. I use natural ingredients to make different coloured doughs. You can use any cookie cutters you like or use your own creativity to make any cookies that you can imagine.

Hop over to the Cartoon Butter Cookies recipe here.

Saturday, October 27, 2012

Massive baking order

I just completed my first large baking order last week. It was quite a good experience. I put my maths to good use, preparing and calculating the amount of ingredients and packaging material that I need. Then buying the ingredients, including loads of flour, sugar, butter and eggs. I think I used 100 eggs at least. The egg seller seems to be very happy. Hehe! :)

The most stressful part would be baking within a short time. I took 1 day to prepare the egg tart dough. 2 days of actual baking. As my oven and mixer is small, I had to do several batches and in-between washing and drying took up some time. I was a little late in delivering the orders and luckily the buyer was very understanding. I received very good reviews and hopefully they are happy with my bakes.

Here's what I had baked. I got a huge sense of satisfaction after completing everything! :)

210 mini chocolate chips muffins


119 chiffon cupcakes - cranberry and banana


145 egg tarts


Sunday, October 07, 2012

For Children's Day

My first mini order for Children's Day. 
20 bags of Mini Chocolate Chips Muffins.

Sunday, September 30, 2012

Aspiring Bakers #23: Desserts on a plate (EXTENDED)

Here's a quick announcement.

Aspiring Bakers #23: Desserts on a plate (September 2012) closing date has been extended to 7 October 2012.

As everyone is busy with mooncakes and exams and this month's theme is also more challenging, Swee San and I have agreed to extend the event for another 7 days.

If you don't know or not sure about what plated dessert is, the rule is to make a main dessert with at least 2 other components (except for garnishes like cut fruits and snow powder, etc).

Some of the suggestions by Swee San are:


If you have great ideas on plating a dessert, do participate and share with us. Look forward to all your entries.

Lastly, the new theme will be announced on 1 October as usual.

Happy Mid-Autumn Festival!
中秋节快乐!

Saturday, September 22, 2012

My first homegrown bittergourd

Some of you might know, my mother loves gardening. We have a long corridor of plants, usually flowering plants and some herbs. Recently, she starts growing a variety of chillies, which I will blog another time.

Now, it's about our very first homegrown bittergourd, which also starts my recent interest in gardening. We don't really know when this bittergourd started growing in our gardening. We always use water that is used to wash vegetables to water our plants. Some bittergourd seeds must have sprouted and grow and cling around all the other plants.

 My first lesson in gardening is identifying plants and its leaves.


My second lesson is identifying the male flowers and female flowers. Female flowers have an obvious baby fruit behind the petals whereas you don’t find any behind the petals of the male flower (more info here).


We spotted the very first female flower on 15 August 2012. And hoping that it will turn into a fruit succesfully, I tried to hand-pollinate the flower. Pluck the male flower and strip off its petals. Lightly brush the pollen-laden anthers of the male flower with the pistil of the female flower. In doing so, you transfer the pollen from the male flower to the female flower.


On the 3rd day after pollination on 18 August 2012, the fruit had visibly grown larger to about 3cm long. Our bittergourd is successfully pollinated!


This was our 1-week old bittergourd on 22 August 2012. It was growing very fast at 8cm long already.


Our 2-week old bittergourd on 29 August 2012 at 12cm long, growing slower.


On the 3rd week on 5 September 2012, the bittergourd has ripened and we had to harvest it.


Look at our first bittergourd! It weighs 156g and 14.5cm long. Compared to the one we bought at the market, it is considered small. But we are already very happy because it is our first time growing! When the bittergourd is ripe enough, the pulp surrounding the seeds is red. Remove the pulp and you can save the seeds to grow again.


Currently, we have another 2 bittergourds growing and they are not hand-pollinated. The ants must have helped them to pollinate!

Monday, September 10, 2012

The end of camera and Chiffon Cakes 1 to 4

I ditched my faulty digital camera which I had been using since 2009. Without a camera, I have to turn to phone photography from this post onwards. It has been so convenient to use handphone for taking photos and I can just upload to my fb and instagram instantly, without the trouble to transfer and edit photos. But the image quality is not as good, so please bear with the quality of my photos now.

I have quite a number of bakes to be posted and to save time, I'm squeezing 4 chiffon cakes into 1 post.

Chiffon Cake #1: Banana Chocolate

18cm chiffon tin:

4 egg yolks
10g sugar
40g oil
20g milk
120g mashed bananas
70g cake flour
10g cocoa powder
1/2 tsp baking powder

4 egg whites
55g sugar
1/4 tsp cream of tartar

Bake 160 deg C, 40 minutes

From 茄子


Chiffon Cake #2: Passionfruit

18cm chiffon tin:

4 egg yolks
20g sugar
48g oil
65g passionfruit juice + seeds of 1 passionfruit
80g cake flour
1 tsp baking powder

4 egg whites
45g sugar
1/4 tsp cream of tartar

Bake 160 deg C, 40 minutes

From 茄子


Chiffon Cake #3: Cranberry Yogurt

17cm (20cm) chiffon tin:

3 (5) egg yolks (use large eggs)
25g (40g) caster sugar
40ml (65ml) vegetable oil
1 tsp (2 tsp) lemon juice
80g (130g) plain yoghurt
80g (130g) cake flour

4 (7) egg whites (use large eggs)
55g (90g) caster sugar

60g (95g) dried cranberries, chopped to small pieces and coat lightly with cake flour

Bake 170 deg C, 35 minutes (45 minutes)

From 好吃戚风蛋糕轻松上手


Chiffon Cake #4: Triple Chocolate

17cm (20cm) chiffon tin:

3 (5) egg yolks (use large eggs)
20g (35g) caster sugar

100g (160g) unsweetened chocolate
10ml (15ml) vegetable oil
*double-boil chocolate and oil till chocolate dissolved

40ml (65ml) water
60g (95g) cake flour
10g (15g) cocoa powder
1/2 tsp (2/3 tsp) baking powder

5 (8) egg whites (use large eggs)
50g (75g) caster sugar

chocolate chips

Bake 170 deg C, 35 minutes (45 minutes)

From 好吃戚风蛋糕轻松上手


Lastly, I apologize for the lack of blog post. You are invited to join my Facebook page as I update there more often.

Monday, July 30, 2012

Mum's Red Glutinous Rice Wine 红糟酒

I would like to share my mum's method of making Red Glutinous Rice Wine. The ingredients may not be that exact because the older generation usually does not measure things exactly in weight when they cook. So I just try my best to write the details. It's good for me too, I might need to refer back in future.

Here are the ingredients needed for making 红糟酒.

Use 1 kg of uncooked glutinous rice (糯米), add water (use lesser water than usual) and cook the rice in a rice cooker. When the rice is cooked, spread the rice in a large tray and leave it aside until the rice cools down to room temperature.


Here's the Red rice yeast (红曲米)and Wine yeast (酒饼). You can get them from Chinese medical hall.


Pound the red yeast till fine. Then pound the wine yeast till fine and powdery form. Mix the red yeast and the wine yeast together.


In a deep glass jar (wash and air-dry the jar before using), fill in a layer of rice, followed by a layer of yeast mixture. Continue to fill in with alternate layers of rice and yeast until done.


Sprinkle some cool boiled water (don't use unboiled tap water) at the top layer.


Here's how it looks. Close the jar and leave it in a cool dark place. On the 3rd day, you can give the mixture a good stir with a clean and dry spoon. Then leave the jar closed and store it until the 21st day when it is ready to harvest. In between, if you check and find that there's a separate layer of  rice and liquid, you can stir the mixture evenly again.


This is the 红糟酒 after 21 days. Mum decided not to put it too long and harvest it.


Fill them in separate containers and put it in fridge to store.


You can also filter the mixture to separate the rice wine (红糟酒) and the wine lees (红糟). Store the wine lees in the fridge. Heat the rice wine till boiling, remove from heat and cool down, fill the wine a in bottle, you can keep it at room temperature and use it for cooking. Both the rice wine and the wine lees can be kept for years.


There are some beliefs that the old generation practise when making this rice wine. One of them is to leave the jar in a corner where no one can see to avoid people looking at or people talking about it. Women should not make this during that time of the month. When you are filling up the jar, if you drop some rice on the table/floor, do not pick up and put back in jar because it may be contaminated. All these may result in the rice wine turning sour or become spoiled.

Lastly, there are many different methods of making this rice wine. The above method is used by my mum who has made these many times. If I miss out any details, I will add it after confirming with my mum. Hope you enjoy this post. :)