Thursday, May 26, 2011

Aspiring Bakers #7: Chocolate Chip Cookies

A brand new start for my baking journey. I'm slowly picking up speed and baking more often than before.

I have not baked any cookies (except for cny) for a long time. As my packet of chocolate chips is dangerously near the expiry date, the chocolate theme for Aspiring Bakers come at the right time.


As I'm quite a fan of Chinese baking books, one of them is 孟老师, I almost feel like baking every single recipe in her book. No, I'm not aspiring to be another Julie (from Julie and Julia). So this is the chocolate chips cookies from her book 孟老师的100道手工饼干. Taste good for home-bake cookies. Crunchiness 7/10. Still looking for the Famous Amos cookies. I remember I bookmark a chinese website for FA cookies recipe before but can't seem to find it. I have too many bookmarked recipes. ;p


Chocolate Chip Cookies 巧克力豆饼干

Ingredients (makes 28 pieces)

100g unsalted butter, soften at room temperature
50g sugar
1/2 tsp vanilla extract
45g egg, lightly beaten
150g cake flour
1/4 tsp baking powder
80g chocolate chips

Method

1. Beat butter, sugar and vanilla extract until well-mixed.
2. Slowly drizzle in the egg, beat till fluffy.
3. Sift in cake flour and baking powder and fold in till well-mixed.
4. Fold in chocolate chips.
5. Drop small teaspoons of dough (about 15g each, 2cm diameter) on baking tray.
6. Bake in pre-heated oven at 170 deg C (top rack) for 20-25 minutes.
(Off the oven, leave the cookies in the oven for another 10 minutes for crispier cookies.)

Recipe adapted from: 孟老师的100道手工饼干

I am submitting this Chocolate Chip Cookies to Aspiring Bakers #7: Chocolate Delight (May 2011), hosted by Doris of Tested & Tasted.

Friday, May 20, 2011

Non-Bake Oreo Cheesecake

Since my brother shifted new home and bringing his 3 kids back home every weekend, I finally have more space and time to spend in the kitchen. I have made steamed cakes, cheesecakes, layered cakes and even chinese dumplings.

Unlike in the past when I posted every single food that I had made, even if they failed and turned out ugly, I'm becoming more and more perfectionist nowadays. So many of them might not appear in my blog because either they fail due to my inexperience in making them or fail in taste and needs some more trials to fine-tune my recipes.


This 
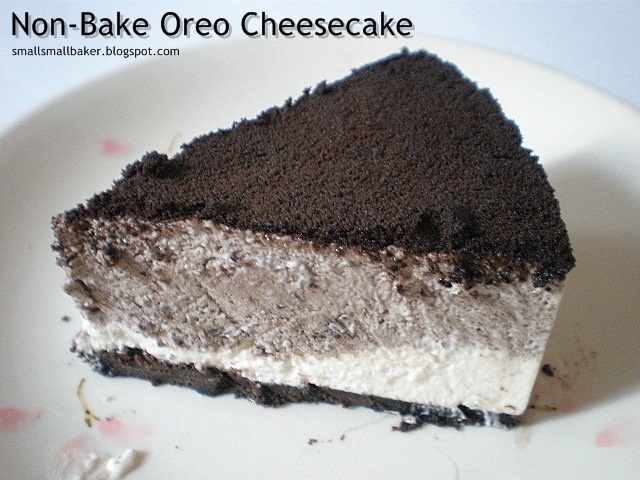
Non-Bake Oreo Cheesecake is one of the better ones. Believe it or not. This is my first time making non-bake cheesecakes. The one and only fear I have for making non-bake cheesecakes is how to take the cake out after chilling without destroying the cake.

According to this book "The Ultimate Indulgence Cheesecake" by Alan Kok (芝味十足), that I have just borrowed.

1. The cookies used to make the base must be crushed until very fine so that it is not crumbly after making them.

2. Use a piece of hot towel to rub the sides of baking tin for easy removal of cake from the tin.


As I'm using a loose-bake cake tin instead of a cake ring, I also have the challenge of how to transfer the cheesecake from the tin to a plate or cake board safely. From our cheesecake expert Jess@Bakericious,

1) The biscuit crumbs must be pressed firmly to the cake tin base, so that the biscuit base will be tight enough and not crack when you try to unmould it from the cake tin base.

2) Chill it at least 2 hrs before you remove from fridge to pour the cheese batter on it.

3) Use a big spactula to loosen 1 corner of the biscuit base and insert in through the bottom of the base. Slowly lift up the cake a bit and insert another spactula. Cross both spactula to support, lift up the whole cake slowly and transfer to the cake board.

I follow all the tips and manage to transfer my Oreo Cheesecake successfully!
(Not the case for my mango cheesecake, the digestive biscuit base crumble and I fail.)


I like this cheesecake very much and I receive very good response from everyone who eat it. Although I'm using non-dairy cream, the result is still very creamy and does not make you feel greasy after eating too much. Keeping this to my favourite list and it will be perfect for any birthday cakes in future. :)

Non-Bake Oreo Cheesecake (I use half of Jess's recipe, refer to hers for 8 inch tin)

Ingredients (makes one 6 inch loose-base round tin)

Biscuit Base:
50g Oreo cookies
25g melted butter

Cream Cheese Filling:
125g cream cheese
15g icing sugar
30ml milk
1/2 tbsp gelatin powder + 35g water
130ml whipping cream - whipped till medium peak (dairy or non-dairy)

1/2 tbsp maple syrup (or honey)
1/4 tsp vanilla extract
5 Oreo cookies, blend finely or crush to small pieces (own preference)

Oreo topping:
3 Oreo cookies, blend or crush till as fine as possible

Method

Biscuit Base:
1. Remove the cream from the Oreo cookies. Blend or crush the cookies as fine as possible.
2. Combine with the melted butter. Press firmly onto the base of the cake tin.
3. Chill for at least 2 hours.

Cream Cheese Filling:
1. Measure water into a bowl and sprinkle in the gelatin (without stirring with a spoon). Set aside to allow the gelatin grains to swell (10 mins) before setting the bowl over a pot of simmering hot water. Stir with a spoon and once the gelatin melts, remove the bowl from the pot and set aside to cool to room temperature.
2. Beat cream cheese with icing sugar till well combined.
3. Add in fresh milk and mix till well combined. Add in gelatin mixture and mix well.
4. Fold in whipped cream and divide mixture into 2 portions.
5. Fold in crushed Oreo cookies into 1 portion and maple syrup (or honey) and vanilla extract into the other portion.
6. Pour in the white portion into the chilled biscuit base. Level the cream cheese filling and put it into the fridge to let it set.
7. Pour the Oreo cream cheese filling onto the set white cream cheese and level it.
8. Put into the fridge to let it set for 2 to 3 hours. (I put in freezer to have ice cream alike texture)
9. Remove from freezer, sprinkle Oreo cookies on top (or decorate as desire) and put back to freeze it.
10. Slice and serve chilled. (refer to tips above)

Recipe adapted from: Bakericious

Monday, May 16, 2011

Do your backup: Part 2

This is Part 2 of Do your backup: A day after Blogger is down.

I feel a need to post more information about backing up our blog. The first part of Do your backup can only save your posts, pages and comments.

Backing up your blog template

The design of your blog (that is, the layout) is not saved. So you need to backup your blog template as well, especially if you are using some templates not from Blogger or have made changes to the default template.

This is the way you save your blog template. It takes less than a minute to do.

1) From your Dashboard, click "Design".

2) Click "Edit HMTL".


3) You will see a page like this (see below). Click "Download Full Template". Your blog template will be saved as a .xml file in your hard drive. And you are done!


3) To load back your saved template, just click "Choose File", select the .xml file from your hard drive (please don't mix this up with the .xml file for blog posts backup), click "Upload", everything will be back to the point of time you have saved it. (Please don't anyhow play with uploading templates, cos it will cause your gadgets to be gone and cannot be restored.)

If you are happy with everything that you have done, thinking that the backing up process is completed. WRONG!

There are still the GADGETS, which appear on your top/side/bottom bars, which I guess all of you have added to your blog. These gadgets are not saved after saving your posts and template. Sadly, the gadgets cannot be restored automatically.

I will share with you my way of saving them in my next post. Need some time to write.

Lastly, I'm not an expert in computer. I actually quite bad at this. All these are based on reading the Help section of Blogger.

If you have better ways of backing up a blog, please share with us, cos I'm not very good at this.

Sunday, May 15, 2011

Do your backup: A day after Blogger is down

I'm writing this post to remind everyone using Blogger to do a backup of all your posts.

2 days ago, Blogger was down and I was unable to login. Yesterday when it was back again, I login to find out that some of my most recent comments were gone and some of the recent edits to my posts were also missing. I was lucky that the damage was not too much. I read through my blog lists and find that everyone using Blogger was affected. I hope no one suffer huge damage.

The first thing I did is to do a backup of all my posts. I did this once in a while, but sometimes I didn't because I either forget, ignore it, or thinking that "nothing will happen, no need to do backup". Before you regret, please do your backup NOW.

This is the way I usually do backup. It takes only a minute to do.

1) From your Dashboard, click "Settings". You will see a page like this (see below).

2) Under Blog Tools, click "Export blog". You will be asked to save your blog as a .xml file in your hard drive. Click "Download blog" to save. And you are done!


3) If let's say you want to load your saved blog, under Blog Tools, click "Import blog", select the .xml file, everything will be back to the point of time you have saved it.

4) If you want to try the above (import blog), I suggest you create a dummy blog to do it, just in case you do damage to your blog. Just create a new blog, import blog and see if everything is back. You can delete this dummy blog after "experimenting". If you want to keep your dummy blog, remember to set "Permissions" to "Only Blog authors" can view, so that we will see not duplicate blogs. :)

Note: Please note that you can only backup all your posts, pages and comments using the above method. It cannot save the design and layout of your blog. The contents of your side bars will not be saved. Let me know if you know how to do it.

If you have better ways of backing up a blog, please share with us, cos I'm not very good at this.

Tuesday, May 10, 2011

Aspiring Bakers #7: Chocolate-Bottom Banana Squares

If you have been seeing this cake posted by bloggers almost every other days, it means MUST BAKE! There are 2 popular versions of this cake. One is from Hearty Bakes, conveniently converted from cups to grams by Min. The other is a healthier version using oil instead of butter by Cook.Bake.Love.


I choose the butter cake version by Hearty Bakes. Texture of the cake is very good, very soft and light butter cake. Unfortunately, the banana taste is not very obvious. Perhaps the bananas are not overriped enough. I wonder which type of bananas are most suitable for baking. I always use the small types which I prefer to eat. The other thing is my butter cakes are always not fragrant enough. Which brand of butter do you use for butter cakes? Do you use margarine? Maybe you can give me some advice.


This is my version topped with both white and milk chocolate chips. :)


Chocolate-Bottom Banana Squares

Ingredients (makes 1 8x8 inch square tin)

113g butter
60g sugar
1 egg, lightly beaten
1 tsp vanilla extract
3 medium-sized bananas, slightly mashed (about 200g)
180g cake flour
1 tsp baking powder
1 tsp baking soda
1/2 tsp salt

Cocoa mixture:
25g cocoa powder + 2 tbsp milk
(Original is 30g cocoa powder. I added milk because it is too dry to mix.)

Toppings:
White and milk chocolate chips

Method

1. Beat butter and sugar until light and fluffy.
2. Slowly drizzle in the egg, then add in vanilla extract and mashed bananas. Beat till creamy.
3. Sift the cake flour, baking powder and baking soda together and fold in 3 separate batches. Mix well with a spatula.
4. Divide the batter into 2 equal portions. Mix 1 portion with cocoa powder and milk.
5. Pour the chocolate batter first, spread evenly (this mixture is quite thick).
6. Pour the plain batter on top of the chocolate batter, spread evenly.
7. Sprinkle chocolate chips on top.
8. Bake in pre-heated oven at 180 deg C for 25-30mins.

Recipe adapted from: Hearty Bakes and Min's Blog

I am submitting this Chocolate-Bottom Banana Squares to Aspiring Bakers #7: Chocolate Delight (May 2011), hosted by Doris of Tested & Tasted.

Monday, May 02, 2011

Some thoughts about Aspiring Bakers and a Durian Layered Cake

Some thoughts about Aspiring Bakers

So fast, we have already hosted Aspiring Bakers 6 times! Check out the wonderful roundups here.

From our favourite chiffon cakes and fruit and cheese themes to special occasions like Christmas, CNY and Valentine's, we have received so many wonderful entries from all the food bloggers. The Fruity March theme was the most popular with 185 entries! Thanks to all the hosts for the hard work. Thanks to everyone who has contributed, I have discovered many new blogs through this event. Those who have not participated yet, please join us from now on!

As the creator of this event, my job is to liaise with the hosts each month, such as coming up with new themes, giving them some reminders of our rules and clarifying any doubts. Although I know the new themes firsthand, I never know how many entries are submitted. So on the first day of each month, I'm always anxious to see the roundups. :)

I'm very serious about this Aspiring Bakers event and very strict too, some hosts might know. :) After every roundup, I check through each and every entry submitted. Make sure that they abide by the rules (must state submitted to Aspiring Bakers) and the links are correct. I count the total number entries, many times. I key them into an Excel spreadsheet to count the number of entries submitted by everyone. And then update them on Aspiring Bakers Family page. This usually takes a few days. The reason is I want to see who is actively participating and who participate continuously without breaks in between. I'm thinking of some rewards to them in future. :)

As for the future themes, they will be decided by our hosts. But I have a whole list of themes that I wish we can do. Do visit my Facebook page to vote and suggest new themes. Those who want to host the event, you can email to: smallsmallbaker@yahoo.com.sg. It will be from November 2011 onwards.

A Durian Layered Cake


This I don't really feel like posting. But for the record of my baking experience. Here it is. I really wanted to practise making layered cakes, so this is my second after my birthday cake. A vanilla sponge cake that uses whole egg method. I always have problem folding the flour in. Texture-wise, I still prefer separated egg method.


Cake is poorly frosted. Should have whipped the cream a little longer and chill it longer before cutting. But I just can't wait to cut, take photos, and eat! I will surely make it again. When the durians get cheaper. :)